Posts

Showing posts from 2017

Oil Pastel Turtle

Image
                                          On this activity we were shown how to draw a turtle then shown different techniques to show texture when we used the oil pastels to color the turtle. I chose the controlled swirling effect on the legs and shell. I then chose to "dot" the head of the turtle in two different colors. On the shell I layered grey and light blue to give it a more metallic feel. I then drug a paperclip through the orange triangles to give them a scaly affect.  Extension Activity: One idea I had for this was to have the students create a new animal that know one has ever heard of. They could make it any shape, color, or size they wanted. They would then give it a name, where it is from, what it eats, and other interesting facts that they can come up with. 
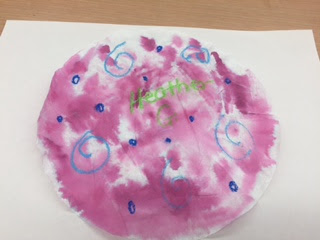
Dot

Image
                                          For this activity we used coffee filters, along with crayons, markers, oil pastels, and water colors to create our dot. We did not have any real guidelines with this activity other than to have our name in the middle. I chose to use a lighter green for my name, with dark blue dots, and light blue swirls in oil pastels. I then chose a lighter purple watercolor to bleed over the rest of the coffee filter.  Extension Activity: This would be a great activity to use at the beginning of the school year as a way for students to showcase their names, favorite designs, and favorite colors. They could introduce themselves to the class and then hang it up and repeat the activity toward the end of the year to see how their tastes have changed and maybe how their techniques have grown throughout the school year. 

Elements and Principles of Design

Image
This was our second activity that we did in class. We were paired up with a classmate and each set out to take pictures reflecting the six elements and principals of design. Once we had those pictures taken we then put them together in a powerpoint and described the element that we thought out picture represented and explained it to the class.  Extension Activity: One activity for this would be to have the students work in smaller groups to see who could come up with the most creative photograph for the element they are reflecting in the picture. The rest of the class and the teacher could vote on which pictures they felt were the most creative and fit the element the best.                                                           Unity: Provides the artwork                                                            with a finished feeling.                                             Texture: Refers to the way something would                      

Clay Designs

Image
For this activity we used clay to create necklaces. We started with the clay being in chunks and worked the clay with our hands so that it would not be so stiff and be easier to mold and work with. Once we had out clay soft, we rolled it out and used different materials like leaves, seashells, branches and pinecones to create different textures on the clay. Once we had decided what we wanted our design to be we placed that design and cut out around it. I chose to do a seashell in a circle and then paint it with a metallic cooper paint. After this was complete we then had to write a short story of where this necklace could have come from.  Extension Activity: There are so many different projects you could do with clay. I would go in a different direction and make something like a pinch pot or hot plate. I would have the students make something a little larger, that they could give as a gift to someone in their family. 

Egg Carton Animal

Image
For this activity we had the book, Brown Bear, read to us. We then reviewed primary and secondary colors. After that we chose a primary color and drew nouns in that color. We then wrote nouns in a different primary color. Once that was complete we picked up an egg carton and the animal we wanted to go with it. I chose a green frog. Once we had colored the egg carton and glued on the body parts, we wrote a sentence about our frog. Extension Activity: For this activity you could have the students create a couple different egg carton animals and have them write a story about them being the main characters. You could then display the animals and the story together. 

Tree Of Life (paper)

Image
One the Tree of Life we had the students create a tree using metallic paint. We took the inspiration from Gustav Klimt and used his design idea as a way for students to showcase more about their families. After the tree was painted, the students then cut out pieces of scrapebook paper to use as a representation of each of their family members. Also, there is a picture of the bulletin board displaying all of the students artwork.  Extension Activity- Something I would do different with this project so that I would turn it into more of a family tree. Instead of just immediate family I would have the students layout the tree starting back as far as the could and continuing down to their generation, this would give the students the opportunity to also research their family heritage somewhat. 

Printmaking

Image
For this activity we used paint on a jelly plate and used a tool to roll over the paint to make a pattern. We cut out our own stencil, mine was the "G", with that I laid down a coat of silver, put the stencil on it and coated over that with a lighter green paint. From this I gained a shimmery effect to the paint with my stencil just being silver. The blue and the pink and blue are texture plates that we used along with the paint to show the texture. The other green piece is a stencil of a snail, in the lighter green paint.  Extension Activity- For this activity I would have the students use it for their science class and have them use leaves as their stencil and a stencil of an endangered animal. 

Flower Drawing

Image
For this activity we drew flowers with watercolors and oil pastels and needed to use different techniques to apply the paint. I used the technique of applying the brown paint and then putting salt over the top of it, when it was dry it gives the paint a sort of speckled affect. For the flower petals, I outlined them in red oil pastel so the color wouldn't bleed. I then used a blending of darker to light on the petals for contrast and added some salt to the middle of the petal for the specked affect. In the blue I used the end of the paintbrush to add the line effect for a bit more texture.  Extension Activity: For this activity you could have your student's draw their favorite animal and use some different techniques to make the appearance of fur or scales on the animals. 

Landscape Line Drawing

Image
For this activity we worked with using different lines as the base for the project. We needed to have a horizon line and to use at least 4 different types of lines. I chose to use the swirls to mimic the waves in the water, the rays of sun have a slight curve to them, the horizon line with multiple different line designs inside and the swirling clouds. We when used watercolors to paint the design we created. We were shown different techniques of applying the watercolor so that some of the colors would be bolder and some would be softer.  Extension Activity: One extension activity you could do for this would be to divide your paper into squares and show different techniques in each square but having one image all together. So making a building out of the squares and each square has a different theme. 

3-D sculpture

Image
                                                 Four our 3-D sculpture we used Alberto Giacometti as our inspiration for this project. We used pipe cleaners to make our sculpture and then wrapped the piper cleaners in aluminum foil. Once you had your whole sculpture covered you  then stuck the bottom into the foam block. I then added a balloon to add something to the person.  Extension Activity: For this you could have the students do their family. They could do representations of the number of people in their family, or people that are important to them. 

Hidden Safari

Image
                                                For our hidden safari project we used cool and warm colors to hide our circus animal. We then used 3 clues to help describe our animal. The animal itself was drawn out in a cool blue tone and then we layered warm tones over the top. Once this was done we used red cellophane glasses to be able to see the animal.  Extension Activity: You could use activity for many other subjects. It would be great for a review game for a test.  You could ask questions and have the answers written out in the cool tone and covered with the warm tone and then have the students wear the glasses to reveal the answers. 

Van Gough

Image
For this project we used Vincent Van Gough as our inspiration for the piece. We used ripped up pieces of tissue paper to fill in the background. We then added oil pastels to the background to give it more of a textured look. After this, we applied a clear gloss paint to seal in the tissue paper and leave a glossy finish. Once dried, I cut out a silhouette of a tree and placed it over the top of the paper. Extension Activity:  Another way you could use this in the classroom is to have the students make a specific background, like the ocean, or a field and put the silhouette of an appropriate animal in the picture.

Project #1 Footprint

Image
Fot this activity, students were to trace and cutout either one or both of their feet on a piece of construction paper. Once they have their footprint cut out they need to put their names on it and decorate around their name using various textures, designs elements, and color. On my footprint I out my name in red glitter, because everything is better with glitter. Next I have a picture of a frog because I love frogs and collect them. I also added a "4" for my four children along with their names, my husbands name and our anniversary date. Also I used an, Aberdeen Wings, logo, and a cut out page from a book, as I love to read. EXTENSION ACTIVITY: For my extension activity I would have the students use their hands and explain about their families. I would want them to label the fingers with their family members names using the family members favorite colors and something that represents them or one of their interests.